If you are anything like me, you probably love spending time shooting and not so much behind your computer screen editing non-stop for long hours.
Well, that used to be me! When I first started my business, my style was all over the place and, because I didn’t quite know how to create the images I wanted right in camera, I used to dread delivering galleries to my clients because of how much I hated editing those images.
Once I learned how to be fully in control of my camera, how to shoot correctly in camera, everything changed. That combined with my knowledge of LR and the workflow I created, gave me the freedom to spend more time doing the things I love and also the ability to edit and deliver galleries super fast!
Today I want to share with you the basics of shooting in manual mode. And once you dominate this feature in your camera, you’ll take control over your sessions and keep your portfolio consistent!
So the first thing you need to know is that once you turn your camera dial to M (manual mode) you’ll be in total control of how you’ll expose your images.
But what’s exposure? Simply put, exposure is the amount of light hitting your camera sensor when you take a photo.
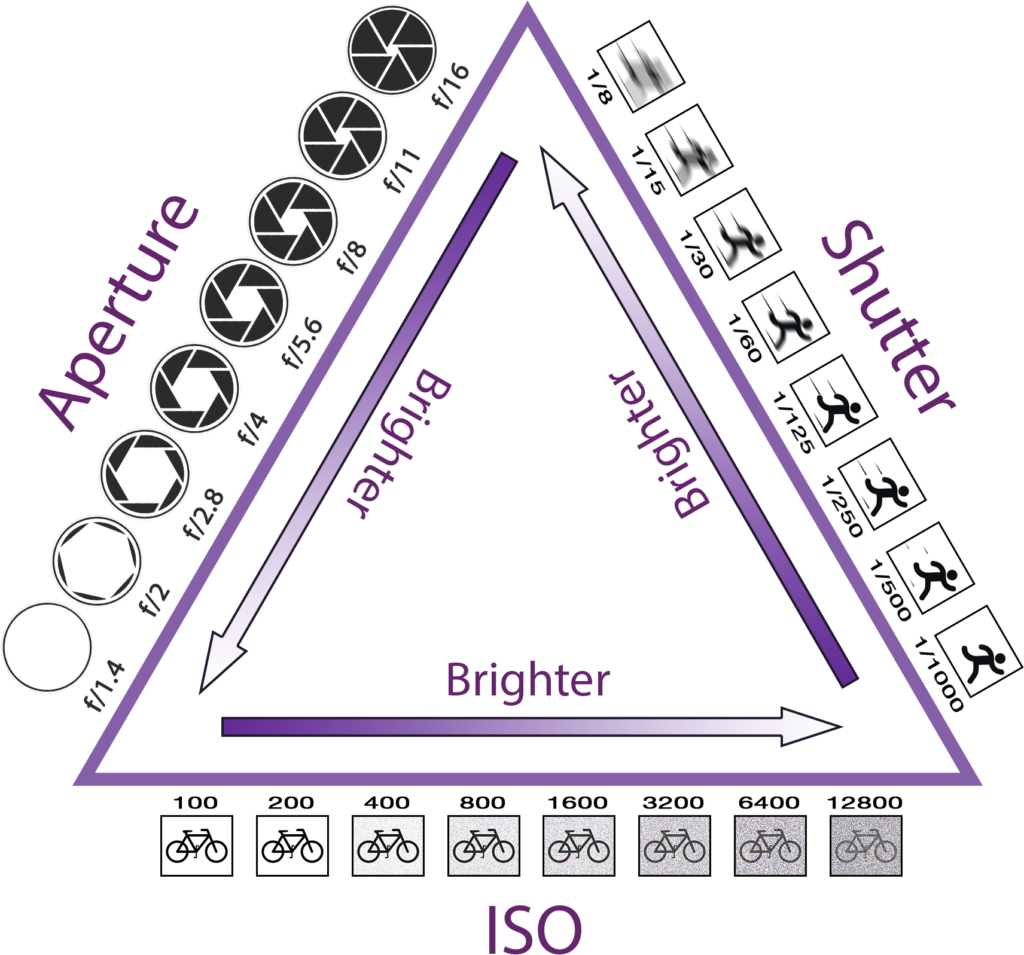
Exposure is controlled by 3 main settings: Shutter Speed, Aperture and ISO. These 3 settings together are called “the exposure triangle”.

So let’s dive into these 3 settings!
Shutter Speed
Shutter speed controls how fast or how slow your sensor is exposed to light. Simply put, think about it as a window curtain that is closed. If you open this curtain quickly and close it back again, you’ll only see the light for a very small period of time.
However, if you open the curtain and let it open for a few minutes before closing it back, the room you’re at will get more light into it.
So with shutter speed you can control how fast or how slow the light will get into your camera.
Fast speed = less light in (Example 1/1000s)
Low speed = more light in (Example 1/200s)
Another thing you should know about shutter speed is that it can also control camera shake/motion blur.
Example, with a fast high speed your camera will freeze motion quicker than with a slow shutter speed. So if you’re shooting kids for example, make sure you set your shutter to a high speed in order to maintain focus and sharpness.
In sum, higher the number, faster is the speed. Lower the number slower the speed.
Aperture
Aperture is how much light you’re allowing into the camera through the lens. Think about that as your eyes. When it’s too bright outside what do you normally do? You squint, right? All that does is control how much light you’re letting into your eyes by opening or closing your eyelids.
Aperture is measured by f/stops. Smaller is the number after that f/, wider is the aperture, meaning more light will be allowed in (example f/1.8; f/2.0 and etc). The larger the number after the f/, smaller is the aperture, meaning less light will get into the camera (example f/8, f/22).
You also should know that aperture controls depth of field (that beautiful blur behind your subject – also known as Bokeh). This is because the wider your aperture, less plane of field will be in focus, while shooting with narrow apertures, it allows more of the field around your subject to be in focus.
Translating to simple words: The smaller the number after that f/, more blur you’ll get around your subject and more light you’ll allow into your camera.

ISO
ISO is how sensible to light your sensor is. Basically, higher your ISO, lighter your image will be. However, this setting can be a little tricky. And here’s why…
Your ISO is also directly related to how much noise/grain you’ll add to your image. Higher the ISO, more chances you’ll have to end up with an image that is grainy.
One thing you should know is the ISO sensitivity of your own camera. Cameras handle ISO differently. For example, my new camera body can handle pretty high ISO (3200) while my secondary body can not be above ISO 2000 without starting to lose image quality. By knowing that information you can make wise choices when shooting in dark conditions.
So now you may think: if ISO can cause problems, why should I even bother cranking that up?
Well, I could go on and on with the answer but I’m going to stick to just one: Sometimes you are at capacity. Your shutter speed is as fast as it can be without compromising sharpness and your aperture is as wide as it can be without compromising focus. So what do you do if you still need more light hitting the sensor? You crank up the ISO.
There’s a feature within Lightroom and Photoshop that allows you to fix grainy images in post processing. If you want to learn more about editing, click here!
There you have it friends! Now it’s time to practice, practice and practice!
I promise you that once you understand this concept and get comfortable controlling your camera in manual mode, you’ll feel more confident in your ability to shoot beautiful images straight out of camera. And by doing so, you’ll start seeing more consistency in your work!
If you have any questions and/or are ready for more, join my Facebook Group for Photographers. There I share free weekly educational content to help photographers grow their business and go from dreamers to achievers. Click HERE and join now!


+ COMMENTS
add a comment